 Building a browser with LEGO
So, let’s imagine we want to construct our own Mozilla based browser.
We order the “Mozilla 3.0 Kit” by LEGO, and after a few days we receive at home a big packet containing two boxes.
One of them is a big black box labeled “Gecko”. The other one is labeled “User Interface”. We'll ignore the big black box for now.
It seems that first we have to build this “User Interface” and then connect it to the big black box…
top
The “User Interface” boxLet’s have a look inside the “User Interface” box. It contains some big, some medium-sized and some small things. We can call them elements or objects. We will see lots of objects: "windows", "preference windows", "dialogs", "pop ups", "buttons", "toolbars", "horizontal boxes", "vertical boxes", "menus", "menu items"… There are indeed many, many elements.
top
The Main WindowSo - we can begin by building a window to accommodate a big panel (which we will connect to the “Gecko” black box) just to navigate the Internet, looking at home pages and similar stuff… We will call this panel (actually a horizontal box), “browser”.
This window that will accommodate the “browser” box we call “main-window”. So, now we begin inserting all kinds of elements inside this window. We insert a menu bar and populate it with menus and menu items. We insert some toolbars that we can populate with some buttons, some text boxes. All of those elements can also contain other elements like images, drop markers and so on…
We can imagine these objects as layers that we are consecutively overlapping. First a window, then toolbars, then menus, toolbar buttons and so on...
Similarly, we will build other windows, such as a window to customize the browser, a preference window, a window to manage extensions, dialogue windows and many, many other parts we understand should belong to our “User Interface”.
top
Describing our “User Interface” In this process we’ve noticed some curious things. Those objects have some properties, attributes, methods, etc… Some windows can be resized, some objects can be dragged. Buttons react to mouse clicks. Pop-ups appear when we mouse over some elements. Some of them "communicate” with us (as users), like pop-ups, dialogs, labels, etc. Most of them have an appearance.
It would be fantastic if we could share our “User Interface”, our windows, our objects, how we have organized them, describing their exactly positions, properties, attributes, words with which they speak to us and so on, just using plain text.
This is possible with XUL. Using XUL (and a couple of other tools like CSS, RDF, XBL, JavaScript) we are able to describe all of our windows (and much more). We need just a text editor to write XUL files. The same goes for the other tools. Very convenient.
In this way we can have the whole "User Interface" as a set of descriptions. And so detailed that we don't need the objects themselves.
But let’s think about how we can organize these files.
It makes a lot of sense to describe things like properties, methods, attributes, etc. separately from words which those elements “talk” (they can change according to the language used by our users) and the appearance those elements have (it can also be changed by themes and other user tools).
So we can imagine we could reorganize our “User Interface” box, inserting in it a package for each window, each one containing three other small packages describing:
top
ChromeNow we have a new “User Interface” box with a set of packages describing how we organized our (XUL) elements, the special abilities they have, words that they speak and how they have to look.
This set of packages is called Chrome.
Each package contains now three items called chrome providers:
content, locale and skin.
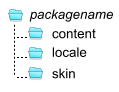 fig.01
top
Add-onsAdd-ons work in this way too. They too add to Firefox a package describing how it works.
If you look carefully inside add-ons, you will see the same structure.
A theme is an add-on that contains just a skin provider.
A language package will contain only the locale provider.
Extensions may contain all of these providers plus some other files or maybe just one content part.
Let's go back to our LEGO box. Imagine you'd like to have a clock on the toolbar
You can maybe build one. You can take some other objects (as pointers, or LCD display) to compose it.
You can for example decide if your clock will read the time from user system or from some atom clock in the net.
You can think about if it will interact with the user and so on...
You are extending the UI adding a new functionality.
You could make the same as we did for our windows, describing your new object "myClock".
You will have also three sets of descriptions:
content - all attributes, properties, types (analog, digital), methods, getters, setters, etc.
locale - If your clock will display for example, the actual date, it would be very nice to display it in the user's language
skin - how your clock will appear, if the display type is analog or digital, etc.
So, you've just built an extension for the browser. You can now package it and offer it at AMO...
top
Firefox native packagesA clean installation from Firefox brings some native packages. We can investigate how many and which packages they are, not looking for the jar files inside the chrome directory, but looking at the chrome manifests (see on the link the XULRunner application part) inside it.
We will look only for those lines that start with content, locale and skin and only for the first and second terms in those lines.

top
The Chrome StructureThere's no requirement that says each package needs to have all three kinds of chrome providers. Not every package contains all three kinds. So, we can recognize some packages with full chrome providers like:
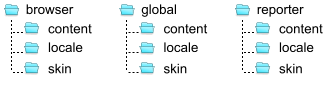 fig.02
and other with partial providers:
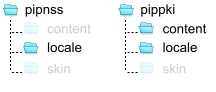 fig.03
This is the chrome structure, and is very important for us. All linkage to documents and images we make, are using the chrome protocol:
url("chrome://package_name/chrome_provider/file_we_want_to_refer_to");
For example:
url(“chrome://browser/skin/Toolbar.png”);
This chrome structure has nothing to do with the files we have on the hard disk. To get our files into this chrome structure, we have first to tell Mozilla where those files exist on the hard disk, i.e., make the association between the chrome protocol and the file protocol. This is the job from chrome.manifest, the Chrome Registry.
top
Firefox Chrome MappingI like to think Firefox (as a Mozilla application) has also this chrome structure, or better, a Firefox mapping of chrome packages:
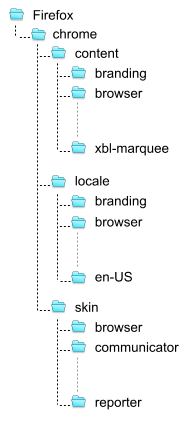 fig.04
We can understand how an Add-on adds itself to the Firefox Chrome Mapping. Let’s take an arbitrary add-on: myaddon
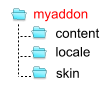 fig.05
After the chrome registration from myAddon, Firefox changes the Mapping:
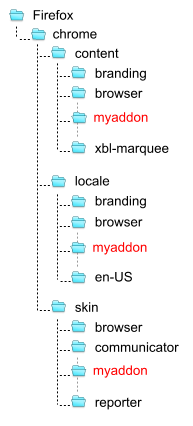 fig.06
I’m just supposing this “Mapping”.
Actually, at a chrome perspective, the packages are organized in the following way. See for yourself with the Chrome List add-on.
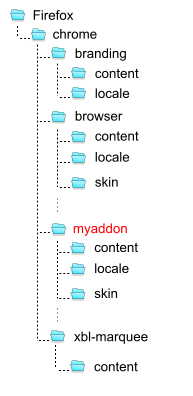 fig.07
top
File OrganizationI have on my workbench an installation of Firefox that has all the chrome files uncompressed. If you look at the file organization after uncompressing the jar files, you will got something very similar to fig.04 :
fig.04  fig.08
 To get this installation to work -- so that Firefox loads from these files instead of the packaged-up files it installed for itself -- I have to modify the chrome manifests to point to the new locations from my files. Let’s take, e.g., the pippki.manifest:
content pippki jar:pippki.jar!/content/pippki/ xpcnativewrappers=yes
This manifest registers only one content provider for the pippki package.
The manifest instructions for a content provider is build in this way:
content packagename uri/to/files/ [flags]
pippki.manifest
 fig.09
We can see in this manifest a new protocol, the "jar:" protocol. We can use this protocol to point files inside a compressed jar file.
But now, after I uncompressed the jar files, I have to point to where my uncompressed files are. We do this relative to where the chrome.manifest resides (actually the pippki.manifest):
 fig.10
Doing this, we are simply telling the chrome registry that the contents from chrome://pippki/content are inside our file://content/pippki/. It sounds confusing, doesn’t it?? But it's actually very simple:
 fig.11
Looking at the above structure we can notice something curious.
We use to organize our files in the way showed above just for convenience.
Actually it doesn't matter which names you give for your folders. You can have any other file structure.
Once you register (point) these files to the corresponding chrome provider, everything will work fine:
 fig.12
which gets the result:
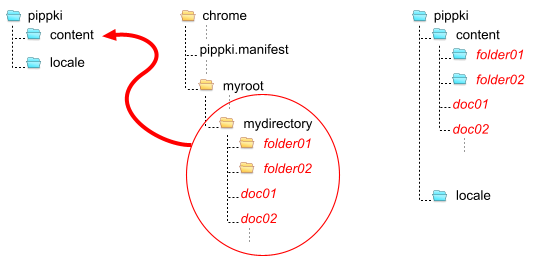 fig.13
Now your file://myroot/mydirectory/doc01 will be available at chrome://pippki/content/doc01
TIP - Uncompressing Firefox's Chrome
You can also have an uncompressed installation of Firefox.
But make sure you do this installation in a separate folder. Don't use it as your default browser.
The best is to pick a zipped file from the nightly and unzip it into a folder of your choice.
Go to the chrome directory and extract the jar files into the same folder that contains those jars.
To the question if you want to override contents, answer yes.
Now you have just to edit the .manifest files with any good text editor and remove this part of code:
jar:packagename.jar!/
Exactly like I did for the pippki package on fig.10.
Now you have a working uncompressed installation from Firefox!
top
Writing a Default Theme Let’s suppose we want to write a default theme for Firefox. This default theme will be shipped together with Firefox.
Theme Structure Our job now is to write a skin provider for all skinnable packages inside Firefox. Let’s take the native packages from table01, which have a skin part:
global, mozapps, help, browser, communicator and reporter.
We know that from the perspective of Firefox's chrome, the packages will have this chrome structure (fig.07, makes easy to understand the "Chrome Protocol"):
fig.07
But as we could see on fig.04, the "Chrome Mapping", a skin package will have this structure:
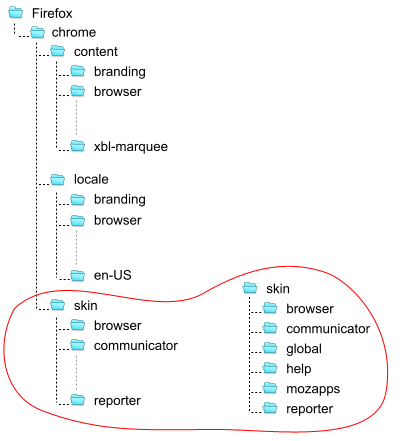 fig.14
Anyway, let’s build a file structure to accommodate our theme on the hard disc.
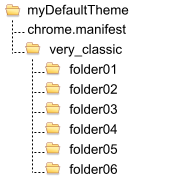 fig.15
Now we have to register our files in the Chrome Registry so they can be accessed using the chrome protocol.
top
Skin Registry To make our folders and files that reside on our hard drive available for Firefox, we need to associate them to corresponding addresses with the chrome protocol. The same as we did for the pippki package, remember?
So, let's see how a skin registry looks:
![]() fig.16
fig.16
In the above image we can see one item that is different from the content manifest. The skinname. That's the internal name and every theme must have one. The default theme's internal name is classic/1.0.
Let's write our chrome.manifest:
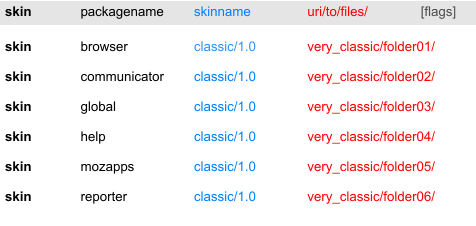 fig.17
With this manifest we are associating our files to the chrome structure:
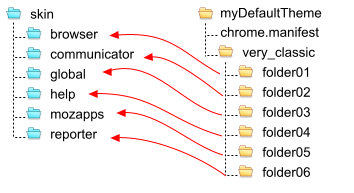 fig.18
This means that, for example, a file placed inside myDefaultTheme/very_classic/folder01/ will be available for Firefox at chrome://skin/browser/. All right?
It's easy to see that the structure we've chosen for our files isn't really good. It's highly recommended for our convenience that we name our folders in a more consistent way (but notice that's not necessary at all .. The file naming on disk is completely up to us):
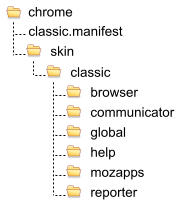 fig.19
Now it looks very similar as fig.08, doesn't' it?
But if you look carefully to table01, you will notice that the reporter package already register a skin provider:
 fig.20
This means we don't need to register a skin provider for the reporter package, because a skin provider is already registered for it.
Otherwise, we would substitute the skin provider for the reporter package, needing to provide css rules for it.
After we remove it our workbench will look so:
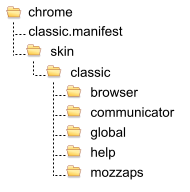 fig.21
Now we have to rewrite our chrome.manifest to point to the new folders:
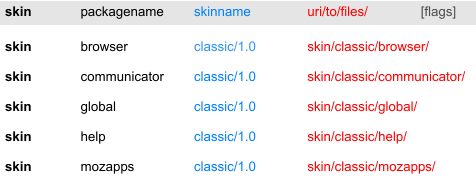 fig.22
And while we're at it, let's rename the file chrome.manifest as classic.manifest.
If we look again at tab.01, we will notice that the help package has no content provider.
Searching for links that could point to the help skin package, I've found nothing.
This leads me to think the skin provider for the help package is unnecessary.
(Also the locale provider. Firefox 3.5 will not have them anymore).
top
Necessary Files Now let’s look which files we need to have inside our folders.
As we repackaged our LEGO "User Interface", we came to a set of object descriptions instead of the objects themselves.
The most important package was the content provider. The content provider has not only descriptions about how objects work (attributes, methods, properties, etc) but also links to the other providers indicating how they look, and what words (and which language) they "speak".
Inside the content provider we will find several files like .xul files, .js , .xml, .xhtml and .css files. They describe how windows are composed out of objects, functions, behaviors and widgets..
We can notice that the content provider already contains some .css files. They contain bindings statements and some basic rules for XUL elements.
For other appearance statements, they contain links to style sheets or images inside the skin provider.
The skin provider must contain these files.
Two files we need to place on the root from our theme. They will appear on the Extension Manager:
icon.png
preview.png
Let's look inside the browser/content directory and search for the keyword "chrome://browser/skin/" to pick files we must provide. Or we can search for the string directly on Firefox 3.0 source . We will search files inside browser/base and browser/components.
We will find on the .xul files some links like:
<?xml-stylesheet href="chrome://browser/skin/" type="text/css"?>
as in browser/content/browser.xul
Actually chrome://browser/skin/ means chrome://browser/skin/browser.css, so the code above is the same as:
<?xml-stylesheet href="chrome://browser/skin/browser.css" type="text/css"?>
Thanks to bsmedberg for pointing this out.
From .xul, .xml and .xhtml files we can see these .css files we must provide:
"chrome://browser/skin/places/places.css",
"chrome://browser/skin/places/editBookmarkOverlay.css",
"chrome://browser/skin/places/organizer.css",
"chrome://browser/skin/places/bookmarkProperties.css",
"chrome://browser/skin/feeds/subscribe.css",
"chrome://browser/skin/preferences/preferences.css",
"chrome://browser/skin/preferences/applications.css",
"chrome://browser/skin/setDesktopBackground.css",
"chrome://browser/skin/searchbar.css",
"chrome://browser/skin/engineManager.css",
"chrome://browser/skin/pageInfo.css" and
"chrome://browser/skin/" alias "chrome://browser/skin/browser.css" .
From .js, .cpp and .xhtml files we have unfortunately some hardcoded images:
"chrome://browser/skin/places/bookmarksMenu.png",
"chrome://browser/skin/page-livemarks.png",
"chrome://browser/skin/feeds/feedIcon16.png",
"chrome://browser/skin/feeds/feedIcon.png",
"chrome://browser/skin/feeds/videoFeedIcon16.png",
"chrome://browser/skin/feeds/videoFeedIcon.png",
"chrome://browser/skin/feeds/audioFeedIcon16.png",
"chrome://browser/skin/feeds/audioFeedIcon.png" and
"chrome://browser/skin/Info.png".
Now, our job is to provide all images and css rules necessary to give appearance to elements defined in browser content packages (with XUL, XML, XHTML). We can do this by creating new folders and links to new files, giving us a structure we find reliable and consistent..
We repeat this process for all the other packages: communicator, global, help(?) and mozapps.
So, we are writing a theme, which will be shipped with Firefox for Windows. It may be installed on supported Windows Operating Systems versions like Windows XP and Windows Vista.
To ensure compatibility and stylistic integration with these different flavors of Windows, we now want to include in our default theme some different files for Windows Vista.
top
FlagsUntil now we didn't touch on the [flags] column from the skin registry, the Manifest Flags.
These manifest flags are a kind of conditional statements. Interesting for us is:
os:
os=WINNT
and osversion:
osversion>=6
With these manifest flags we can match Windows Vista with this:
os=WINNT osversion>=6
A complete list of possible OS values can be seeing here.
So, our manifest now could look something like this, if we want to provide different image and rules for the browser package on Vista :
 fig.23
Our file structure will look in this way:
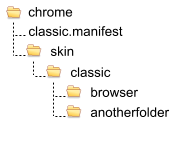 fig.24
The conditional flag manifest we've wrote above will match in this way:
if the Operational System is Windows XP then register the content from classic/browser as chrome://browser/skin/
if the Operational System is Windows Vista then register the content form classic/anotherfolder as chrome://browser/skin/
And now suppose we want to provide different Vista files also for the global and mozapps packages.
Let's also choose some better organization for our files on the hard drive and our structure from fig.19 will become:
 fig.25
And our classic.manifest:
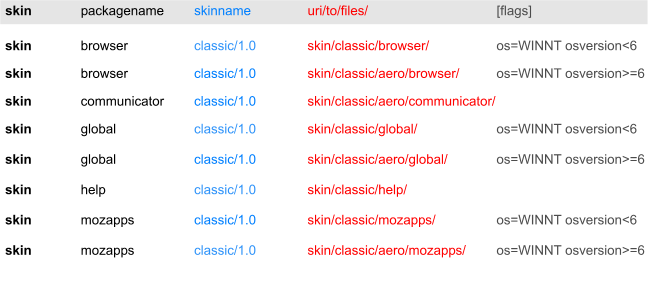 fig.26
This will result into this chrome structure:
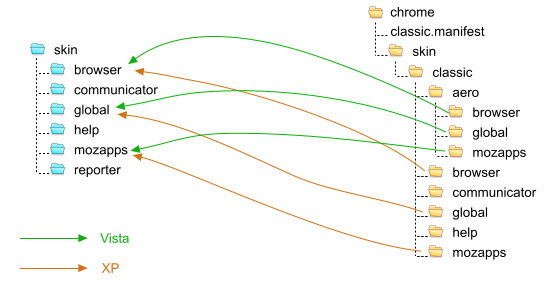 fig.27
Actually the default theme's manifest is not created "by hand" as we did, but in Firefox's build process.
It uses JAR Manifests that are automatically processed from the building system.
The work on making the default theme is far more complicated as I described above...
Finally let's talk about third party themes.
top
Writing a Third Party Theme Now we want to provide an alternative theme to the default theme we've written above.
This theme will be additionally installed and, according to the user preferences, will take effect or not.
"If more than one skin is registered for a package, the chrome registry will select the best-fit skin using the user's preferences."Remember that our Default Theme we've written above has already been installed together with Firefox (or any other Mozilla Application).
It means all necessary skin providers for the native packages (and, as we have seen above, extensions bring also their skin providers), are already registered.
The third party theme will fully substitute skin providers for the skinnable packages and/or will overwrite rules defined from the already registered skin providers.
top Install Manifest Our third party theme has to be installed first.
For it, we have to provide a file with some information about the theme:
the Install Manifest.
This file must be named install.rdf and have to live at the root from our theme.
Let's have a look at this manifest:
<?xml version="1.0"?>

<RDF xmlns="http://www.w3.org/1999/02/22-rdf-syntax-ns#"
     xmlns:em="http://www.mozilla.org/2004/em-rdf#">

  <Description about="urn:mozilla:install-manifest">
    <!-- properties -->
  </Description>

</RDF>
The required properties we have to insert in our Descriptions tag are:
Make sure you are on the safe side and don't use for internalName spaces in the string. Also avoid uppercase.
For example, don't use something like My Theme, but mytheme, or my_theme instead.
For the name property you can use whatever you want.
OK. Let's see an example how an Install Manifest could look like. This Manifest will install a Theme "Our Theme" on Firefox:
Everywhere we use the string ourtheme, please change it to the name of your theme!!!!
install.rdf
<?xml version="1.0"?>
<RDF xmlns="http://www.w3.org/1999/02/22-rdf-syntax-ns#"
 xmlns:em="http://www.mozilla.org/2004/em-rdf#">

  <Description about="urn:mozilla:install-manifest">
<!-- Our Theme GUID -->
    <em:id>ourtheme@ourorganization.tld</em:id>
    <em:version>1.0.0</em:version>
    <em:type>4</em:type>
<!-- Target Application this extension can install into,
     with minimum and maximum supported versions. -->
    <em:targetApplication>
      <Description>
<!-- Firefox GUID -->
        <em:id>{ec8030f7-c20a-464f-9b0e-13a3a9e97384}</em:id>
        <em:minVersion>2.0</em:minVersion>
        <em:maxVersion>3.0.*</em:maxVersion>
      </Description>
    </em:targetApplication>

<!-- Front End MetaData -->
    <em:name>Our Theme</em:name>

<!-- Front End Integration Hooks (used by Theme Manager)-->
    <em:internalName>ourtheme</em:internalName>
  </Description>
</RDF>
Please look at install.rdf and Install Manifests for additional properties and further information.
As we have seen at Necessary Files,
we need also two other files living at the root from our theme:
icon.png
preview.png
And of course a chrome.manifest file.
We can imagine such a structure for our theme:
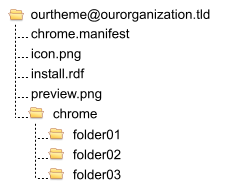 fig.28
As we already know, the structure inside the chrome folder can be whatever we want. It depends how we register then at chrome.manifest.
Tip - Installing "Our Theme"
Actually, we can immediately install "Our Theme" and start to play with it:

When Firefox get started, it will say that a new Addon has been installed. Select "Use Theme" and restart Firefox.
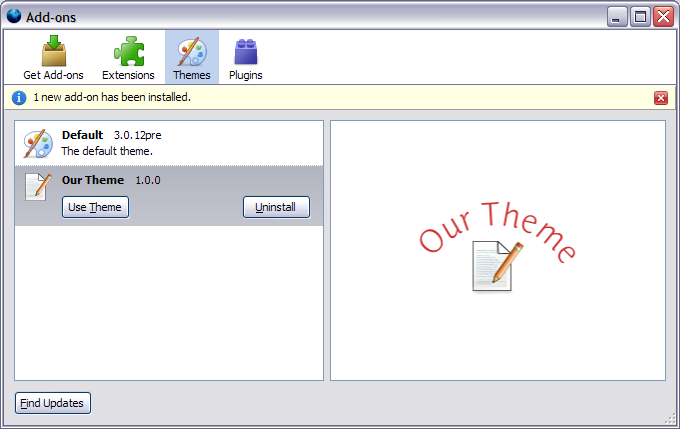
You have successfully installed the new "Our Theme"!
* On your install.rdf, you can change the em:name, em:id and em:version to fit your wishes.
But remember: your root folder must be named as the string you have on em:id.
Create also your own icon.png and preview.png.
OK. If you did the steps on the Tip above, you will see the same like using the default theme. Why?
If you know the answer, congrats! You have really read all the above stuff... Wow!
You are seeing the same like the default theme because we didn't register any skin provider. But actually skin providers are already registered for all skinnable packages from the Default Theme.
To make some changes on the appearance we have to work first with the chrome.manifest.
top
"Light-weight" Themes If we want to replace some toolbar buttons, change some backgrounds, some font colors for the main-window (browser.xul), this approach is the right one for us.
It is actually perfect for beginners.
It will simply overwrite rules defined from the Default Theme, without having to register other skin providers for the skinnable packages.
We will need just a little CSS knowledge.
The DOMInspector can be a huge help for us. It's always a good idea to learn how it works...
This approach is very similar to the userChrome.css way of customization. But with an important difference:
The userChrome.css rules will always apply. Also when the user changes the theme.
With this approach our rules applies only if our theme is the one we are using.
So, let's see another Manifest Instruction, the style instruction:
Thanks to Mook for pointing this out
![]() fig.29
fig.29
This instruction will register an overlay, a custom CSS, which will be applied to a chrome window, in our case the main-window. The chrome://browser/content/browser.xul.
We have to indicate a file which will overlay the default set of rules applied to browser.xul.
But note that only stylesheets at chrome URIs can be applied in this way.
So, to make this file available at a chrome perspective we have to first register a package containing only a skin provider. Let's call this new package customskin.
The skin instruction could look like:
 fig.30
The skinname we have to use is the same we've declared on our install.rdf as internalName.
Very Important
Notice that once we have registered a chrome package, it belongs now to the Chrome, and the file customskin.css is available to the whole application.
Since a style overlay will also exist for the whole application once we've called it at our chrome.manifest, it's necessary to first registry an empty file customskin.css for the default theme.
After this we can define our own skin provider, which will substitute the first one.
In this way we are sure that our customskin.css will not apply when the Default Theme (or another theme) is in use instead of our theme.
Our skin instructions will look like:
 fig.30a
Remember that:
This means that if the user has selected our theme as used theme, our customskin.css will take effect. If the default theme or some other theme is the chosen one, the empty file (at chrome/classic/customskin) will take effect.
Another theme using this same approach will apply its rules as soon as the user choose it... So, it's very convenient for all themes following this approach to maintain this name.
Now, let's organize the file structure. We need a folder named classic/customskin with an empty file - customskin.css - inside it, for other themes except our theme.
And we need another folder named
customskin and a file customskin.css inside it, to accomodate our rules. Something like this:
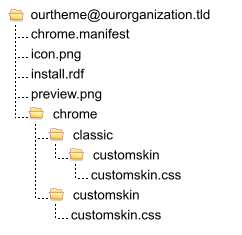 fig.31
At a chrome perspective (fig.07), after registering the customskin package and the respectively skin providers, the chrome will look like:
 fig.32
Our style instruction now looks:
 fig.33
And our chrome.manifest will look like:
style	chrome://browser/content/browser.xul	chrome://customskin/skin/customskin.css
skin	customskin	classic/1.0		chrome/classic/customskin/
skin	customskin	ourtheme		chrome/customskin/
Tip - Registering the light-weight "Our Theme"
OK. Now let's play a bit with our installed theme "Our Theme".
style	chrome://browser/content/browser.xul	chrome://customskin/skin/customskin.css
skin	customskin	classic/1.0		chrome/classic/customskin/
skin	customskin	ourtheme		chrome/customskin/
menubar {
  background-color: #d9eaff;
}
You can make several changes, just overwriting the rules defined on the Default Theme. You can also create new rules. Whatever you want.
Let's see another example:
#reload-button {
  list-style-image: url(Toolbar.png);
  -moz-image-region: auto !important;
}
This method has many advantages:
"Heavy-weight" Themes So, but maybe we need more control over our theme, because we have really different UI proposition as the Default Theme.
We could considerate to substitute all or some skin providers for the skinnable packages.
We will need knowledge about:
The approach described here is very similar to that we used writing our Default Theme. It's also the approach on most Themes Tutorials you can find on the web.
Here we will substitute the already-registered skin providers for the skinnable packages we want to style.
Our file structure will be very similar to what we used for the "light-weight" approach. Something like fig.28.
As we have seen at Theme Structure for the Default Theme we wrote, the skinnable packages will be:
global, mozapps, help, browser, communicator and reporter.
But... as we have seen on Skin Registry:
So, our file structure will look like this:
 fig.34
And our chrome.manifest:
 fig.35
Remember that this approach actually substitute the Default Theme, it means we have to provide all rules and images necessary to fully skin the three packages.
The best way to start to work on this is to copy the correspondent files we'll need from the Default Theme.
Tip - Registering the heavy-weight "Our Theme"
If you have followed the instructions at Tip - Installing "Our Theme" and Tip - Registering the light-weight "Our Theme", please:
If you only have installed your theme like at Tip - Installing "Our Theme":
Now your file structure looks like fig.34.
Now, register the folders you created:
skin	browser		ourtheme	chrome/browser/
skin	global		ourtheme	chrome/global/
skin	mozapps		ourtheme	chrome/mozapps/
It's time to change something:
menubar {
    background-color: #d9eaff;
}
Remember: you can every time transform your "light-weight" Theme to a "heavy-weight" and vice-versa!
top
Packaging the ThemeNow we have to package our theme for distribute it.
The best way to do this is using the .jar in .jar approach:
We will firstly package our chrome folder and subsequently package it and the remaining files, so that we will have at the end a .jar inside another .jar.
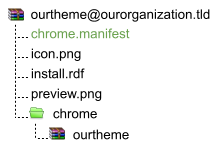 fig.36
Because we have now our files inside a .jar file, we have to modify our chrome.manifest, to point to the files inside the .jar file.
We have already seen the JAR Protocol at fig.09.
For our "light-weight" Theme, we will have such a chrome.manifest:
style	chrome://browser/content/browser.xul	chrome://customskin/skin/customskin.css
skin	customskin	classic/1.0		jar:chrome/ourtheme.jar!/classic/customskin/
skin	customskin	ourtheme		jar:chrome/ourtheme.jar!/customskin/
The file structure from fig.31 will turn into this jar structure:
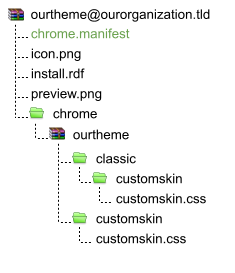 fig.37
For our "heavy-weight" Theme, the chrome.manifest will be:
skin	browser		ourtheme	jar:chrome/ourtheme.jar!/browser/
skin	global		ourtheme	jar:chrome/ourtheme.jar!/global/
skin	mozapps		ourtheme	jar:chrome/ourtheme.jar!/mozapps/
and the file structure from fig.34 turns to:
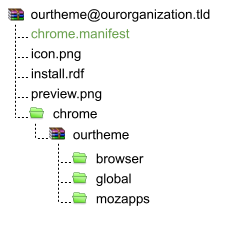 fig.38
Tip - Packaging "Our Theme"
Now it's time to package your theme. It doesn't matter if you made it in the "light-weight" or "heavy-weight" approach.
The procedure will be the same.
You need first a good compression's software. I heavily recommend 7-Zip.
Now you have an installable theme, which you can distribute ;-)
Using a script on WindowsYou can also "automate" this process using the command line from 7-zip:
On my workbench I have wrote a script that does the job automatically.
You just need to build a comfortable file structure.
Thumbs.db
*.tmp
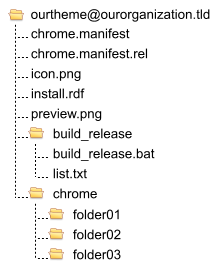 fig.39
@echo off & setlocal enabledelayedexpansion

set extShortNameTag=em:internalName
cd ..\
set extFolder=%cd%

set xmlTag=em:version


SET path=%extFolder%;%path%

if not exist %extFolder%\install.rdf (
echo ----------------------------------
echo #### INSTALL.RDF IS MISSING ######
echo ----------------------------------
pause
goto :eof
)

::::*** look for name on install.rdf file ***::::
for /f "delims=</> tokens=3" %%i in ('findstr "%extShortNameTag%" "%extFolder%\install.rdf"') do set extShortName=%%i
:::: delims will separate all words between <, / or >. Tokens gives the third word which is separated

::::****** Important: this will create a folder  C:\"name of theme"\releases. Feel free to choose another folder if you want ******::::

set tempFolder=C:\%extShortName%\releases

::::************************************************************************************************************::::

::::*** look for version's number on install.rdf file ***::::
for /f "delims=</> tokens=3" %%i in ('findstr "%xmlTag%" "%extFolder%\install.rdf"') do set version=%%i
:::: delims will separate all words between <, / or >. Tokens gives the third word which is separated

::::*** going inside chrome folder ***::::
cd /d %extFolder%\chrome

::::*** make the inner jar file (no compression) ***::::
set name=%extFolder%\chrome\%extshortName%

if exist %name%.jar del %name%.jar
%ProgramFiles%\7-Zip\7z.exe a -tzip "%name%.jar" * -r -mx=0 -x@%extFolder%\build_jar\list.txt
cd /d %extFolder%

:::: rename chrome.manifest files
ren chrome.manifest chrome.manifest.dev
ren chrome.manifest.rel chrome.manifest
set filename=%tempFolder%\%extShortName%_%version%

:::: build outer jar
if exist %filename%.jar del %filename%.jar
%ProgramFiles%\7-Zip\7z.exe  a -tzip -r -mx=9 %filename%.jar chrome.manifest install.rdf icon.png preview.png *.jar
cd /d %extFolder%

:::: rename chrome.manifest files
ren chrome.manifest chrome.manifest.rel
ren chrome.manifest.dev chrome.manifest

:::: cleanup after making the outer jar
cd /d %extFolder%\chrome
del %extShortName%.jar
I hope this article can be useful for you!!
top
Referencestop
Links
